Manage Campaigns
Emails are an effective channel for conveying updates throughout a user's lifecycles and keeping them engaged. Plumb5 comes with an intuitive campaign creation wizard that makes it easy to execute highly personalized campaigns.
Here is quick summary of the possibilities offered by the campaign interface
- Leverage our extensive templates library to create personalized & highly responsive Email templates.
- Personalize messages to each user's preferences and behavior, across the various stages of their lifecycle.
- Automate A/B message testing for your campaign.
- Test your campaign with internal team members before sending it to your users.
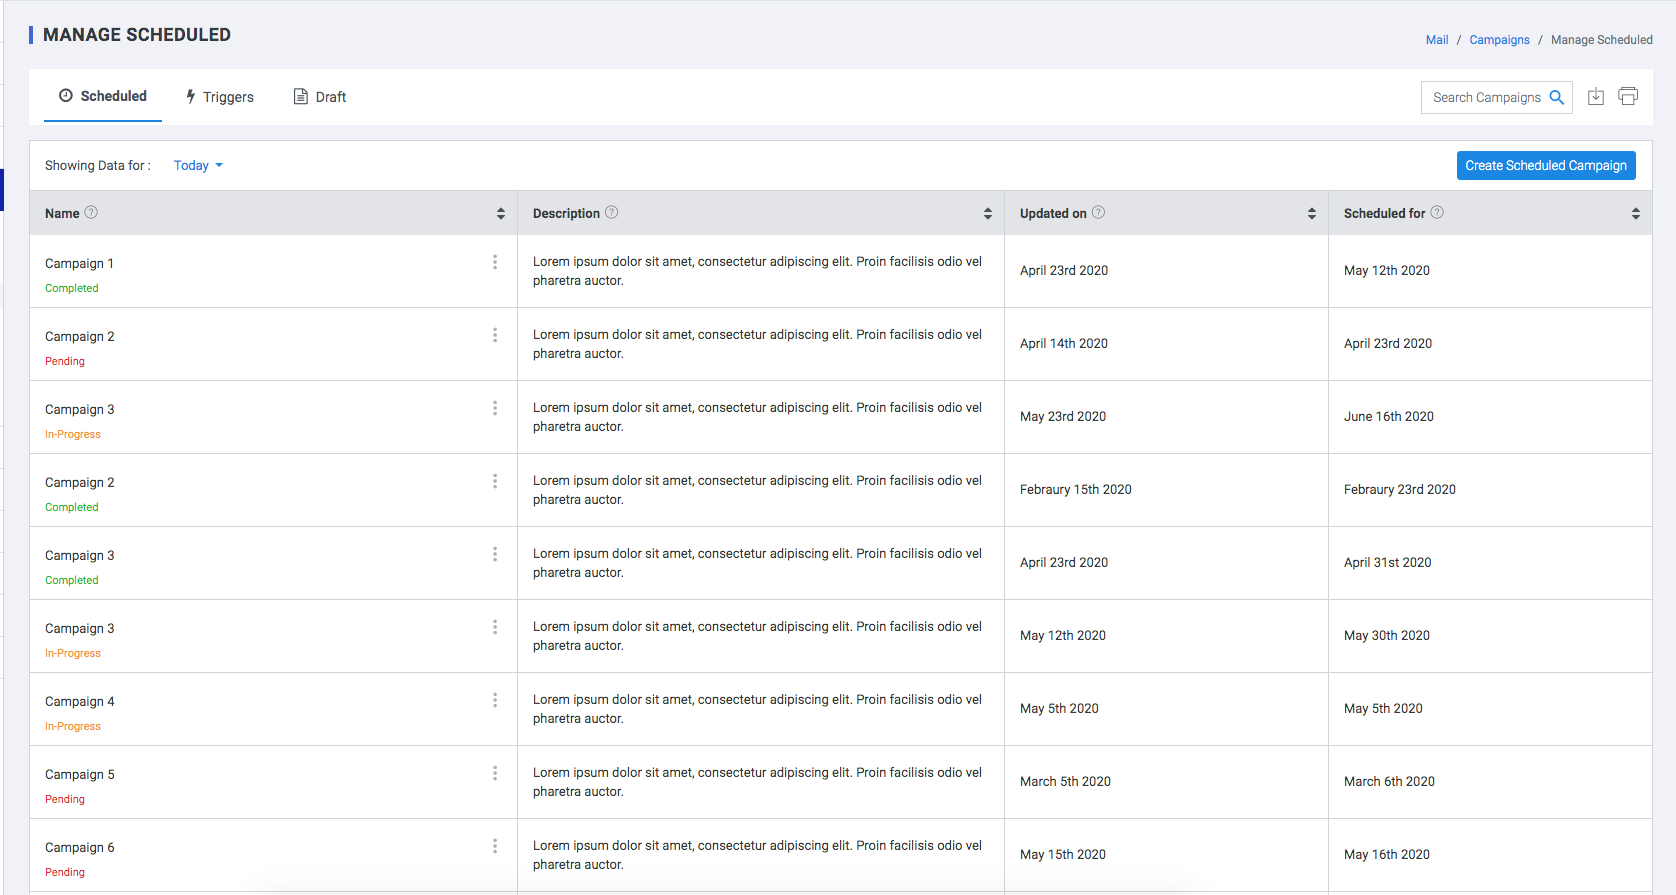
Select Campaign Type
Scheduled Campaigns
These are stand-alone messages that are sent to your users only once and generally consist of time-bound offers, product updates, and so on. Such campaigns end as soon as they're delivered to the target audience.
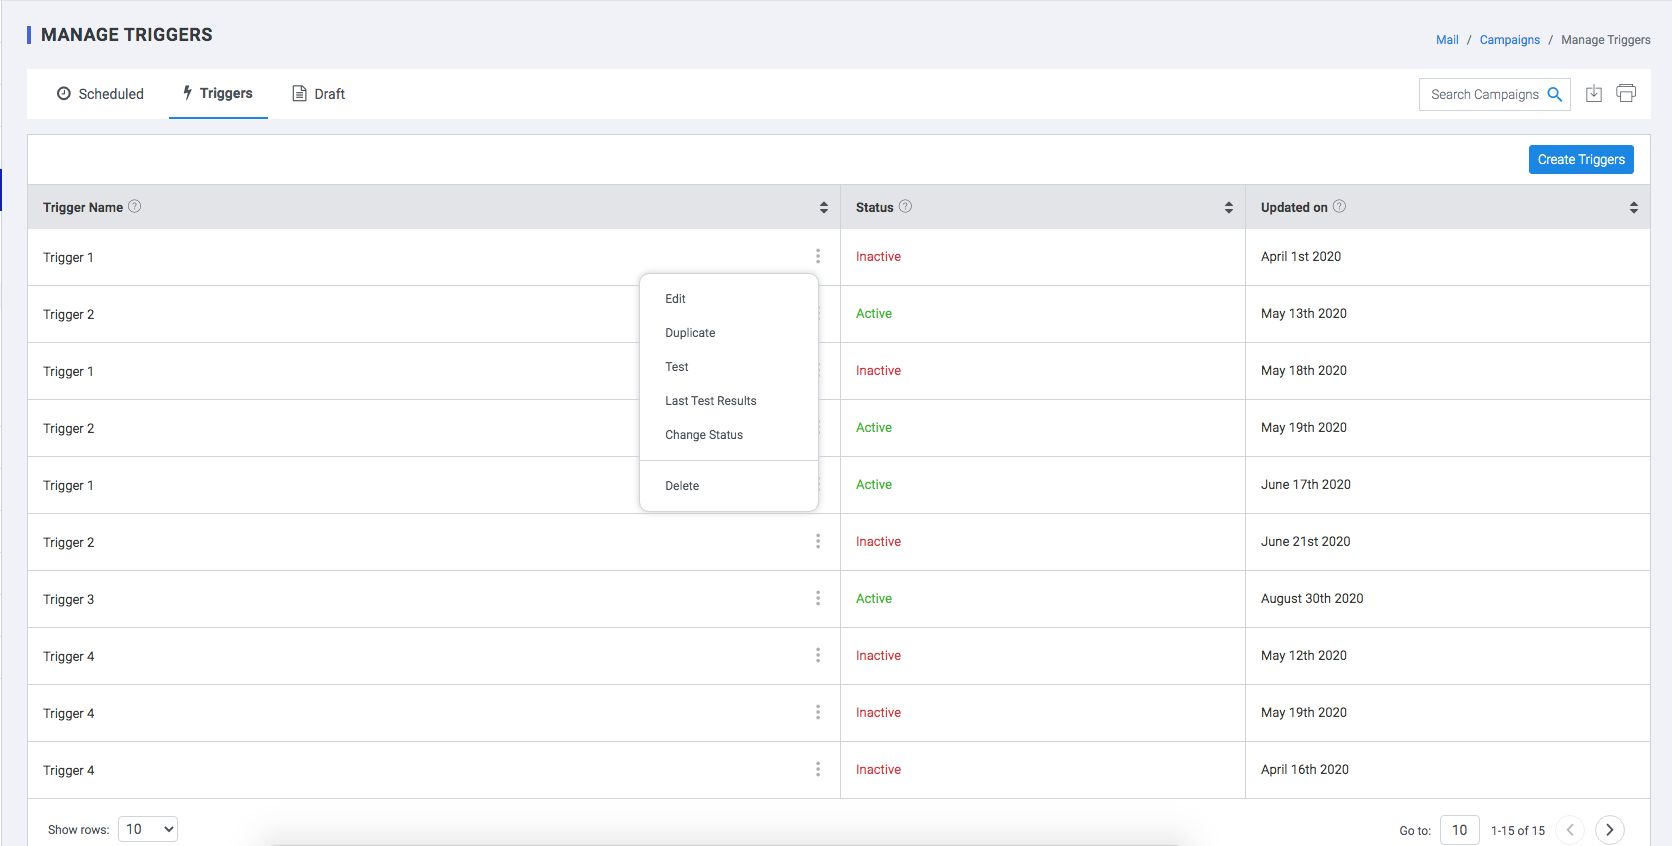
Triggered
These are ongoing cycles of communication that are sent to only those users of your target audience, who perform a particular event on your app/website.
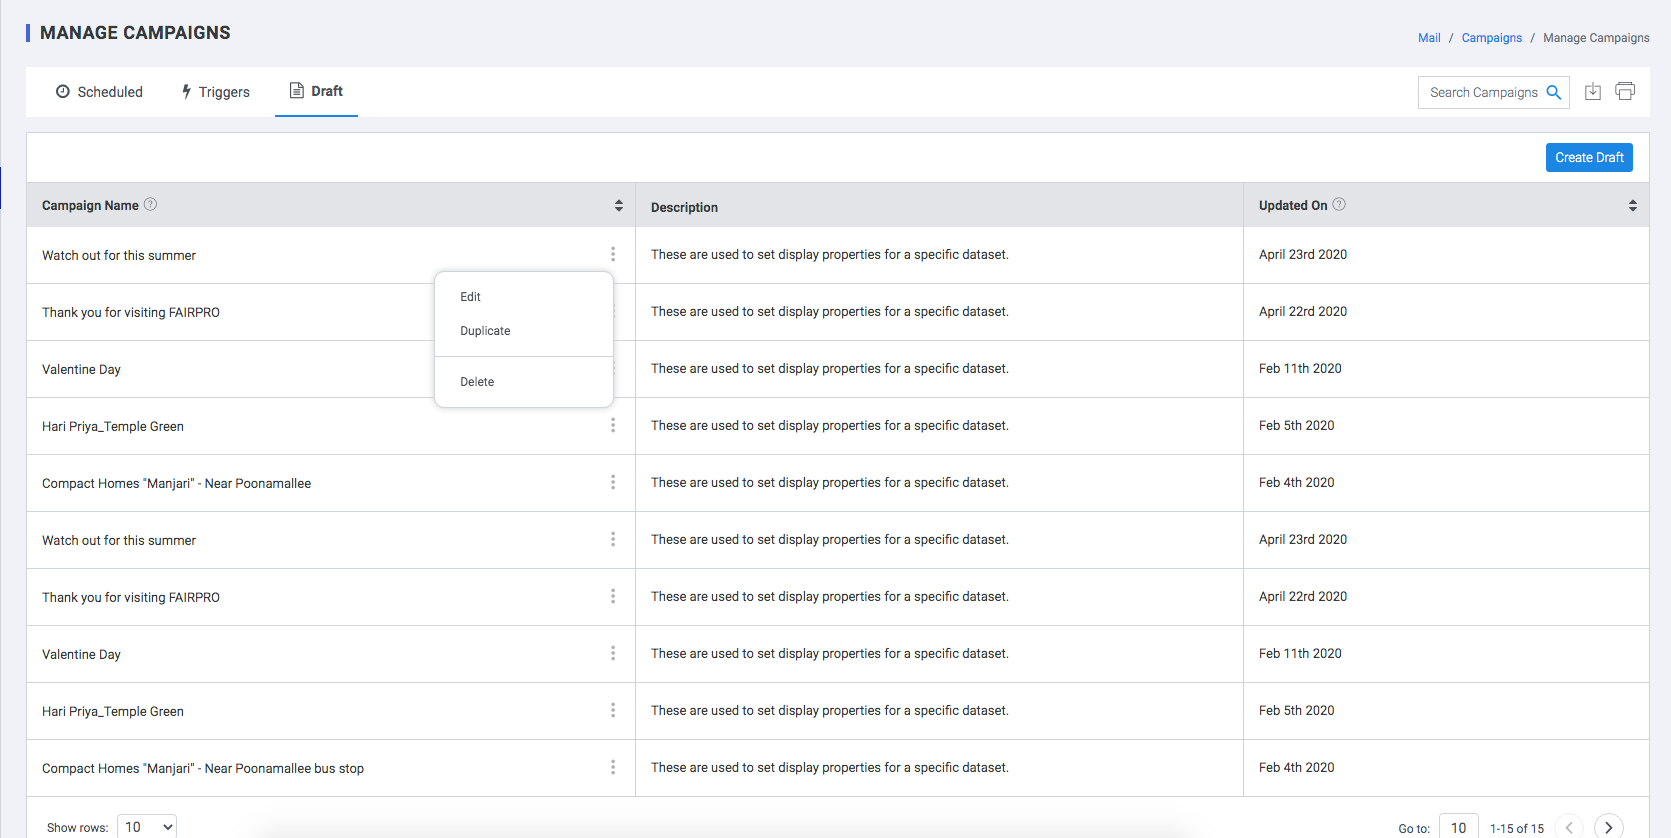
Draft
This is a draft campaign that can be saved for editing at a later time.
Create Scheduled Campaigns
Step 1 - Campaign information
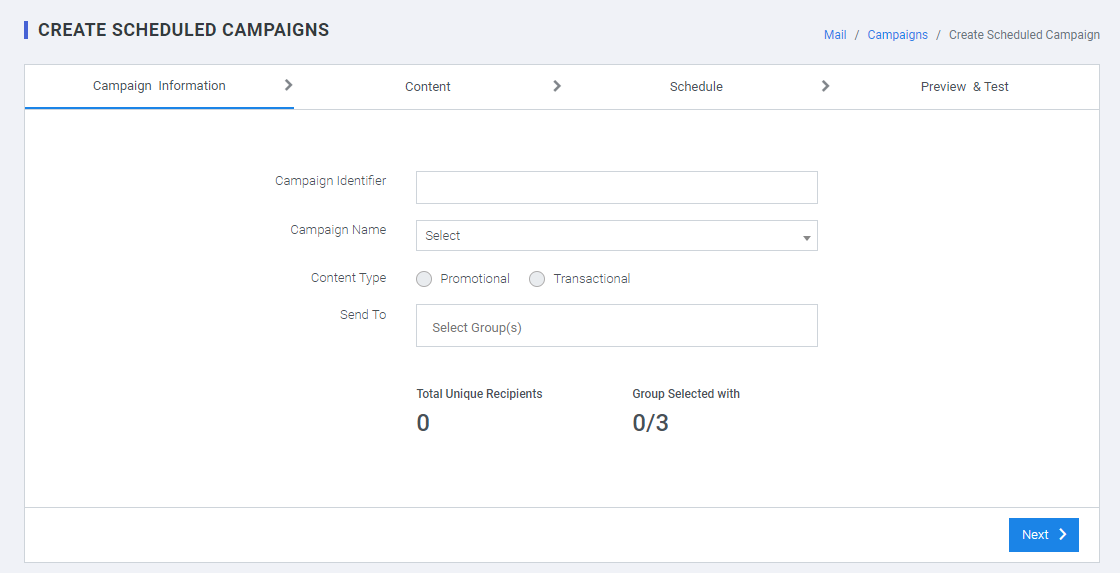
- Campaign Identifier : Select a unique Campaign identifier
- Campaign Name : Select a Campaign Name from the list of campaigns created
- Content Type:
- Select Promotional to send the Email to only those users of the target audience who have not unsubscribed to your channel.
- Select Transactional to send Email to all users in the target audience, irrespective of whether or not they've unsubscribed to your channel in the past.
- Send To : Select single or multiple Groups to send mail to
Note:
Total Unique Recipients : Total number of unique recipients who will receive this email. Deduplication is done by plumb5.
Credits Remaining : Total number of usable Email credits remaining in this account.
Step 2 - Content
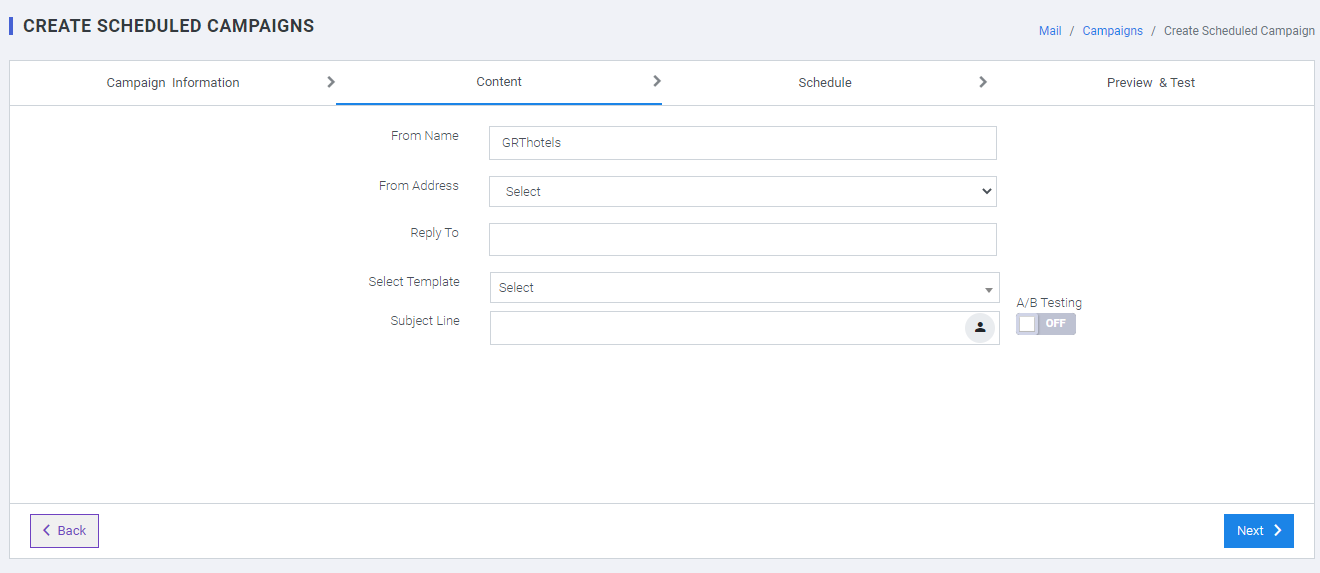
- From Name: Add the Name from which you'd like your users to receive the email.
- From Address: Add the Email Address from which you'd like your users to receive the email.
- Reply to : Specify the receiving email address.
- Subject Line: Add Subject Line.
- Select Template : Select from list of templates created previously.
- Unsubscribe Option: Click this to add an Unsubscribe link in the footer of the mail.
- Forward Option: Click this to add an Unsubscribe link in the footer of the mail.
Step 3 - Schedule
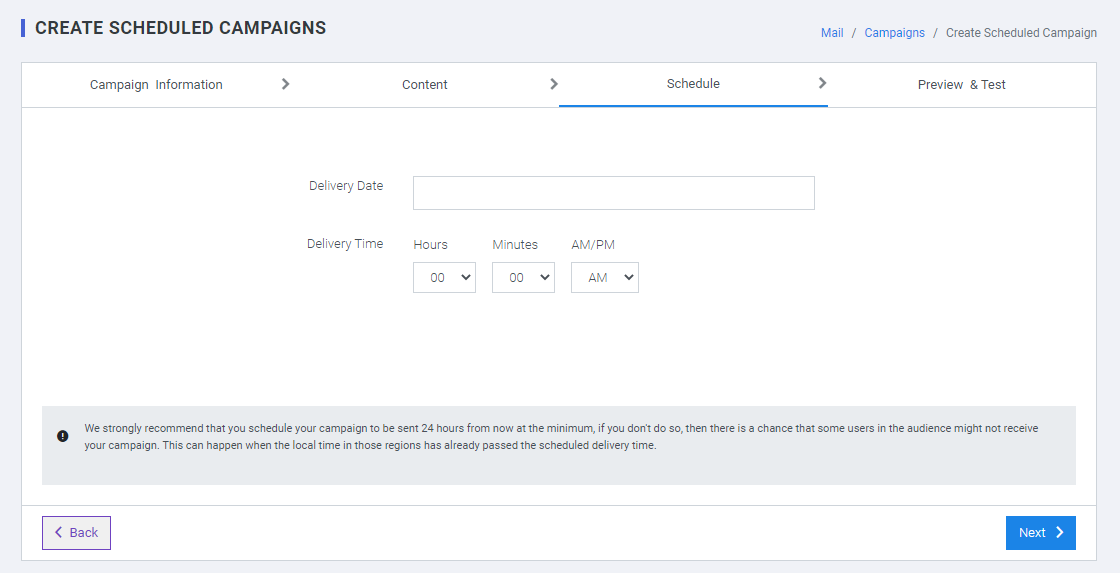
- Delivery Date: Specify the delivery date
- Delivery Time: Specify the delivery time
Step 4 - Preview & Test
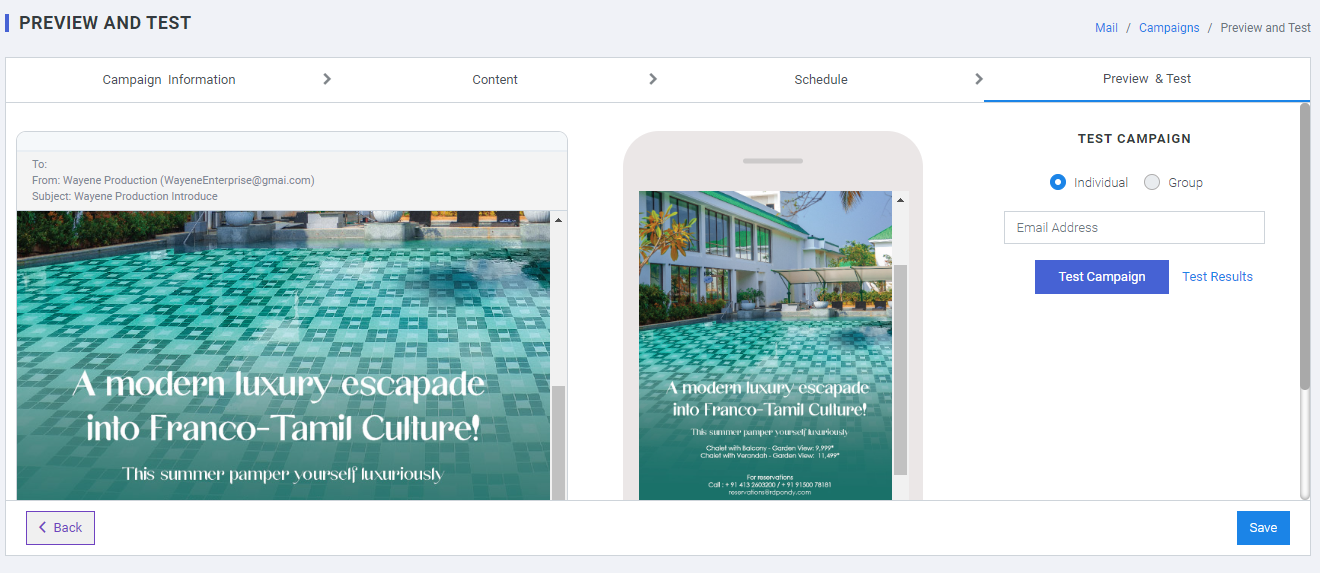
Test the campaign by sending it to an internal group of Email Address.
A/B Testing
Create A/B Testing Campaigns
A/B testing, also known as split testing, refers to a process wherein two or more versions of a variable are shown to a selected contact group at the same time to determine which version leaves the maximum impact and drives business metrics.
For example, you might send two versions of an email to your customer list (randomizing the list first, of course) and figure out which one generates more sales. Then you can just send out the winning version next time.
There are several benefits of A/B testing. A/B testing lets you increase user engagement, reduce bounce rates, increase conversion rates, minimize risk, and effectively create content. Running an A/B test can have significant positive effects on your site or mobile app
Step 1 - Campaign information
- Campaign Identifier: Select a unique Campaign identifier
- Campaign Name: Select a Campaign Name from the list of campaigns created
-
Content Type:
- Select Promotional to send the Email to only those users of the target audience who have not unsubscribed to your channel.
- Select Transactional to send Email to all users in the target audience, irrespective of whether or not they've unsubscribed to your channel in the past.
- Send To: Select single or multiple Groups to send mail to
Note:
- Total Unique Recipients: Total number of unique recipients who will receive this email. Deduplication is done by plumb5.
- Credits Remaining: Total number of usable Email credits remaining in this account.
Step 2 - Content
- From Name: Add the Name from which you'd like your users to receive the email.
- From Address: Add the Email Address from which you'd like your users to receive the email.
- Reply to: Specify the receiving email address.
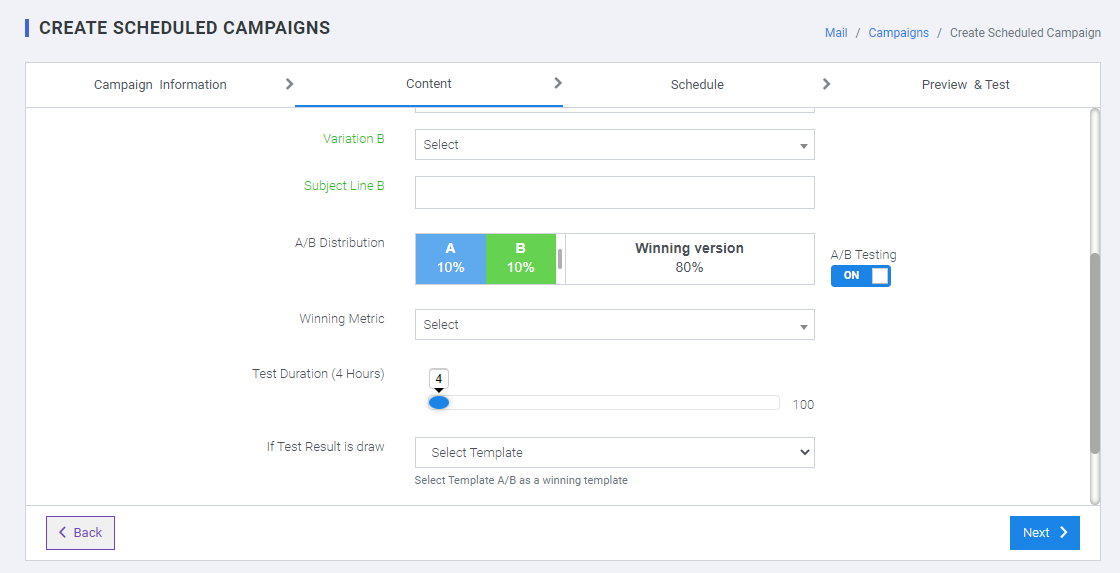
- Activate the A/B Testing Icon button to plan the execution of the A/B Testing
- Variant A: Select one of the templates created under the campaign name
- Subject Line A: Add a fresh first Subject Line.
- Variant B: Select the template created under the campaign name
- Subject Line B: Add a fresh second Subject Line.
- A/B Distribution: Select the range of the distribution to be given for both the variant and the winning metrics to be fixed
- Winning Metrics: This has to two option – OPEN RATE & CLICK RATE to select
- Test Duration (5 Hrs): Select the duration of the test to be conducted
- If Test Result Is Draw: Select the option from TEMPLATE A or TEMPLATE B to execute if the test result is a draw.
Note:- To Execute A/B Testing campaign, you need to have two different templates & two different subject lines in any combination.
Step 3 - Schedule
- Delivery Date: Specify the delivery date
- Delivery Time: Specify the delivery time
Step 4 - Preview & Test
Test the campaign by sending it to an internal group of Email Addresses.
Create Trigger Campaigns
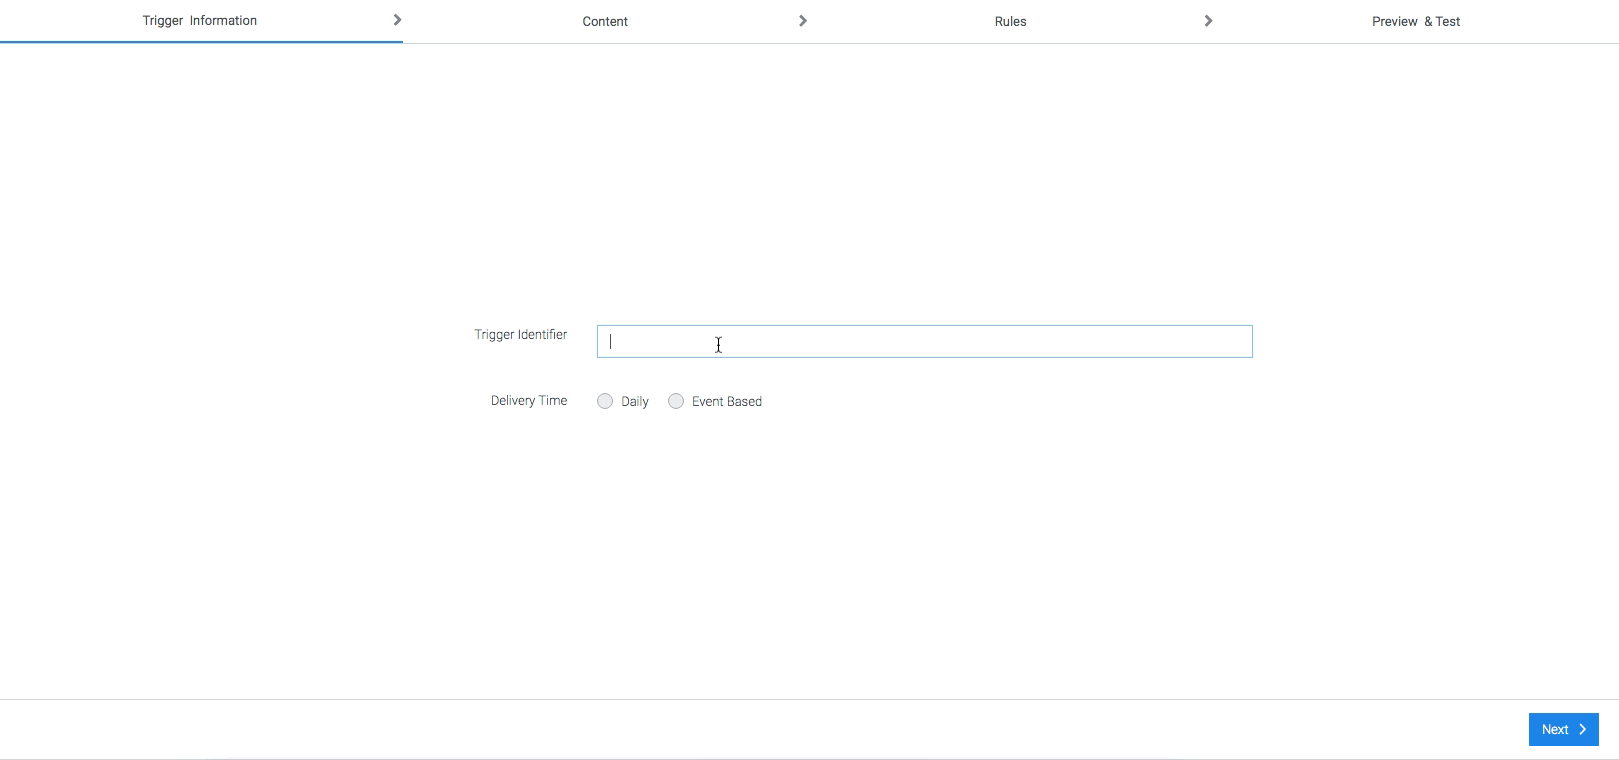
Step 1 - Trigger Information
- Trigger Identifier: Select a unique Campaign identifier
- Delivery Time:
- Select Promotional to send the Email to only those users of the target audience who have not unsubscribed to your channel.
- Select Transactional to send Email to all users in the target audience, irrespective of whether or not they've unsubscribed to your channel in the past.
Step 2 - Content
- From Name: Add the Name from which you'd like your users to receive the email.
- From Address: Add the Email Address from which you'd like your users to receive the email.
- Reply to : Specify the receiving email address.
- Subject Line: Add Subject Line.
- Select Template : Select from list of templates created previously.
- Unsubscribe Option: Click this to add an Unsubscribe link in the footer of the mail.
- Forward Option: Click this to add an Unsubscribe link in the footer of the mail.
Step 3 - Rules
In this section, users can assign a combination of conditions to interactions so that an engagement can be triggered when the conditions are met. The display rules could be -
- By Audience
- By Behavior
- By interaction
- By Interaction Event
- By Profile
By Audience
The form is displayed based on the visitor type, that is, whether the visitor belongs or not to a segment.
- If the visitor type is -
- Unknown - Unknown visitors are anonymous users, who can be tracked by their IP and have no email tag attached to it
Note: Assigning this rule displays content to unknown visitors only.
- If the Visitor belongs or not belongs to segment and If the visitor is a lead or a prospect,
- Leads or Prospects are visitors, where the visiting IP is tagged to an email id but their purchase status is null. Email gets tagged either during a web engagement or from a mail campaign.
Note: Assigning this rule displays your content to leads only.
By Behaviour
The form is displayed based on the behaviour of the visitor.
- If the visitor's total behavioral score is - This one is for the agile marketers. If a user has enabled scoring for every parameter like frequency, recency, time spent, page depth or actions, the user can display content based on aggregated scores. Click here to view a guide on Visitor Scoring and Segmentation.
Note: Assigning this rule displays user content to visitors, belonging to a particular score range.
- If the visitor's session is/is not - Display messages for every new session. Trigger messages based on visitor session count. For example: Show a custom message when he is back on your website, maybe the third time.
Note: Assigning this rule displays user content to visitors, with a particular session count.
- If the visitor's page depth is/is not - Engage respective visitor based on the depth of a session. For example: If the visitor's current session has extended to the third page, display a custom message. If it extends to the fifth page, present a different message. Input your depth level and get started.
Note: Assigning this rule displays user content to visitors, with a particular page depth of a session.
- If the visitor's total page view is/is not - Engage visitor based on the number of pages viewed. If a visitor, who has already browsed more than 8-10 pages, it's time to engage. Just input your page count to trigger your message
Note: Assigning this rule displays user content to visitors, with a particular page count.
- If the visitor's frequency is/is not - Display messages in context based on the frequency of the visitor. If user has frequent visitors, it’s time to engage them and move them to the goal path
Note: Assigning this rule displays user content to visitors, based on frequency count.
- If the visitor is on a particular page - Enter the page url. Click to check except query string
- If the visitor ’ s source is direct/referrer - If the visitor's source is direct, Ask a question or get insights from a direct new visitor
Note: Assigning this rule displays user content to visitors, who visit the site directly.
- If the visitor's is/is not a mail respondent - If the visitor's is a mail respondent, show relevant messages if the visitor is visiting the website from a mail campaign, move them to the desired goal path. This rule can be enabled for emails sent from Plumb5 Email platform.
Note: Assigning this rule displays user content to visitors, who visit from the user mail campaign.
- If the visitor's search keyword is - Show custom messages to your visitor based on their search keyword. For example: If the visitor comes to the website from Google Search, the user can customize the content or banner, based on the search term, used in Google.
Note: Assigning this rule displays user content to visitors, when their search keyword tag matches the tag, specified by the user.
- If the visitor ’ s country is/is not - Enter the country name. Display the country name of the visitor.
- If the visitor ’ s city is/is not - Enter the city name. Display the city name of the visitor.
- If the visitor is/is not already visited pages - Enter the page URL. Click to select whether the visitor is/has not already visited the entered pages
- If the visitor ’ s overall time spent on site - Engage the visitor based on the time spent on the site. Input the time spent on the site in seconds.
- If the visitor’s browser is Mobile/Desktop device - Click options if the visitor’s browser is mobile or desktop device.
By Interaction
The form is displayed based on the visitor interactions.
- If the visitor clicked a specific button All clicks/Recent clicks: Show contextual messages or offers based on click events. Users should enable event-tracking on Plumb5 tracking scripts to be able to sync event data with the interactions.
Note: Assigning this rule displays user content to visitors, who have clicked a specific button.
- If the visitor's clicked a specific price range - Show custom offers to visitors who are searching for products within a particular price range. Users should enable event-tracking on Plumb5 tracking scripts to be able to sync event data with the interactions.
Note: Assigning this rule displays user content to visitors, who have selected a specific form choice.
- If the visitor's interacted with a chat agent - Trigger relevant messages based on past chat responses. Login to a Plumb5 account and create groups of chat respondents. Assign the group to the interaction.
Note: Assigning this rule displays user content to visitors, who already have a chat history.
- If the visitor's response to your mail campaigns is - User can display custom messages for mail recipients who are highly responsive. This works in sync with the Plumb5 Email platform to access the mail response segments. View the Mail Marketing article to know more about available response segments.
Note: Assigning this rule displays the content to visitors, who belong to the specified response segment.
- If the visitor responded to a particular form: Select the form from the drop down list to check whether the visitor responded to a particular form or not.
- If the visitor has not responded to a particular form: Select the form from the drop down list to check whether the visitor has not responded to a particular form.
- If the visitor responded to a form with an answer: Select the form from the drop down list to check whether the visitor has responded to a form with an answer.
- If the visitor closed the form for Nth time, then don ’ t show: Check to view if the visitor has closed the form Nth time.
- If the visitor added these products to the cart: Display targeted messages or offers based on "Add to cart" events. Users should enable event-tracking on Plumb5 tracking scripts, to be able to sync event data with the interactions.
Note: Assigning this rule displays user content to visitors, who have added the specified products to the cart.
- If the visitor's viewed but not added these products to the cart: Show custom messages or offers based on page views of the specified products.
Note: Assigning this rule displays user content to visitors, who have viewed the specified products but have not added to cart yet.
- If the visitor's dropped a product from the cart: Display personalized messages or offers based on drop-out tags of a visitor. Integrate user store data with Plumb5, to be able to sync transaction data. Click here to view a guide on Ecommerce Integration.
Note: Assigning this rule displays user content to visitors, who have added the specified products to the cart but have not purchased it yet.
- If the customer purchased any of these products: Show related accessories or offers based on past purchases of browsing customers. Integrate user stored data with Plumb5 or upload purchase segmentation data. Click here to view a guide on Ecommerce Integration.
Note: Assigning this rule displays user content to visitors, who have purchased the specified products.
- If the customer has not purchased any of these products: Show related accessories or offers to browsing customers, based on product affinity tags. Integrate user store data with Plumb5 or upload purchase segmentation data. Click here to view guide on Ecommerce Integration.
Note: Assigning this rule displays user content to visitors, who have not purchased any of the specified products.
- If the customer's total purchase is: Display personalized messages or offers based on purchase points of the user browsing customer. Integrate user store data with Plumb5 and create customer groups based on total purchases. Click here to view a guide on Ecommerce Integration.
Note: Assigning this rule displays user content to customers, where the total purchase count matches the range specified by the user.
- If the customer's current value is: Display personalized messages or offers based on current value status of the browsing customer. Current value status is calculated by integrating transaction data and spends data. Spend data needs to be imported into the user Plumb5 account. Click here to view a guide on Ecommerce Integration and look for the feature "Acquisition Costs".
Note: Assigning this rule displays user content to visitors, where the total value count matches the range, specified by user
By Event
The form is displayed based on the interaction events triggered by the visitor.
- If the visitor ’ s form impression is: Show related accessories or offers to browsing customers, based on visitor ’ s form total impression count.
- If the visitor ’ s form is closed, the impression is: Show related accessories or offers to browsing customers, based on visitor’s form closed count.
- If the visitor ’ s total form response: Show related accessories or offers to browsing customers, based on visitor ’ s total form responses.
- Show this form only Nth time: Show related form only the times the number is entered.
By Profile
The form is displayed based on the visitor profile.
Note: Assigning this rule displays user content to visitors, where the sentiment tag matches the tag, specified by the user.
- If the customer/prospect's online sentiment is: Display personalized messages or offers based on sentiments of customer or prospect. It could be online sentiments based on social posts or it could be responses to engagement campaigns. To make this work, users must enable the sentiment search feature to sync all sentiment results.
- If the customer/prospect's social status is: Display personalized messages based on the social activity of the prospect or the customer. For example: Show a custom message if the visitors frequently visit the website from Facebook. To make this work, users must run the customer search feature to sync all social profiles.
- If the customer/prospect's influential score is: Display custom messages based on visitor's social influential score. This works based on Klout Scores. To make this work, users must run the customer search feature to sync all social profiles.
- If the customer/prospect's offline sentiment is: Display personalized messages for sentiment data that user already has it offline. Import data into the user Plumb5 account to give access to sentiment data by users.
- If the customer/prospect's product rating is: Display targeted messages based on customer's rating for the product. Integrate the ratings widget in Plumb5 to give access to the rating responses by customer.
- If the prospect's nurture status is: Display targeted messages or offers to user prospects, based on their status. This works in sync with the Plumb5 Prospect Base to access status data user prospects. Users can even import prospects from SalesForce into Plumb5 Contacts and get started.
- If the customer/prospect's gender is: Display personalized messages based on gender. Using third party lists, we have tagged professional information with respect to the given email id. It is subjective to availability of information.
- If the customer/prospect's marital status is: Display personalized messages based on their marital status. Using third party lists, we have tagged professional information with respect to the given email id. It is subjective to availability of information.
- If the customer/prospect's profession/industry is: If you are a B2B marketer, user could display interactions based on the visitor's professional information. Using third party lists, professional information is tagged with respect to the given email id. It is subjective to availability of information.
- If the visitor is not connected socially: Display user messages to visitors who are still not connected on user social pages. To make this work, user must run the customer search feature to sync all social profiles.
- If the customer/prospect loyalty points are: Display user form based on loyalty points. Set a number range so that users can display it to customers or prospects within a specific score range. To make this work, user must either sync community data on Plumb5 to access score data or import an external list.
- If the customer's RFMS score is: Display user form based on RFMS score on Plumb5 (needs to be configured) or user could import score list and assign a score range in the form. Show key messages to visitors with low scores as they could be drifting prospects or customers. Users can even set it for the RFS score of respective prospect which helps in engaging a drifting prospect.
Step 4 - Preview & Test
Test the campaign by sending it to an internal group of Email Address.
Create Draft
Create a draft campaign for future editing.
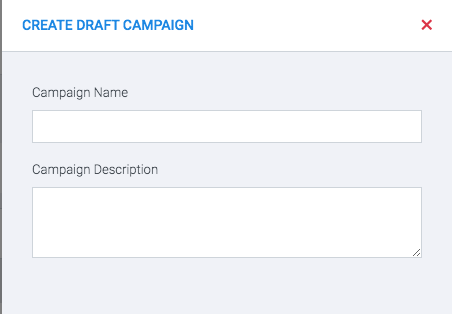
- Campaign Name : Add a unique campaign Name
- Campaign Description: Add a brief description of the campaign.